Adherent Cell Culture Guidance for 12-well Teton Slide Kits
Optimizing Confluency
Optimizing cell culture seeding can be started using a 96-well plate. Plate a range of seeding concentrations and incubate according to experimental needs. Visually inspect via bright field microscopy to confirm an even monolayer across the wells at the target confluency. Proceed to seeding into the 12-well Teton Slide Kit and utilize one of our optimization kits to further assess the performance of the cells, surface coatings and treatments. Note the difference in surface area – a standard 96-well plate is 0.32cm2 per well while a 12-well Teton Slide Kit is 0.42cm2. For reference, we use 9,000-10,000 HeLa cells per well of a 12-well and incubate at 15-18 hours to achieve 50-70% confluency.
Custom Surface Coatings
When utilizing the Teton Slide Kits, ensure that you are using the best surface for your cell type. Element Biosciences offers two slide coating options: Poly-L-Lysine coated glass slides, or uncoated glass slides. For the uncoated slides, our Teton CytoProfiling User Guide provides protocols for coating with the following surfaces: Collagen, Fibronectin, Gelatin, Laminin, Matrigel or Poly-L-Lysine. Once coated, store the slides as indicated for up to 10 days.
Optimizing Cell Culture with Cell Paint Markers
If you plan on using a custom protein panel, you can optimize for both cell culture and screen candidate custom antibodies using the Teton Custom Antibody Screening Kit. If you are looking to optimize only the cell culture portion, that can be completed on instrument with the Teton Onboard Cell Paint Imaging Kit, or off-instrument with a fluorescent microscope and the Teton Cell Paint Probe Kit.
Refer to the following documentation for more information:
- Teton Cell Culture Optimization Technical Note
- Teton Custom Antibody Screening Technical Note
- Teton Optimization & Screening Guide
Cell Culture Best Practices for Adherent Cells
Seed cells onto the slide
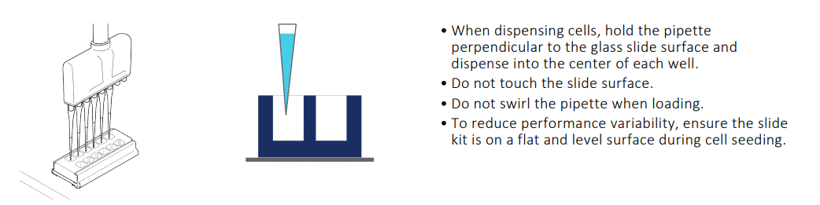
Proper pipetting techniques are critical to ensure an even monolayer of cells. Videos are provided in the next section to further highlight these techniques.
When seeding cells, hold the pipette perpendicular to the slide and ensure that the pipette is not touching the glass slide. Gently dispense the cells into the well using a multichannel pipette.
When seeding cells, dispense liquid only once into the slide kit. For example, if doing a series of dilutions, prepare the dilutions in a 96-well plate. Avoid adding cells and then topping off with additional media.
Distribute cells using a rocking motion

Gently distribute the cells using a forward-and-back, then side-to-side motion.
Do not move in a circular motion.
Customers may find it easier to place the slide in a 10 cm dish. At a slow pace, move the slide in a North-South motion ensuring the slide moves ~5 inches (12.5 cm) in each direction. Pause and then move the slide in the East-West direction.
When moving to the incubator, make sure to not disturb the cells or introduce rotational movement. Repeat the motion in the incubator as well to ensure cells remain properly distributed.
Incubate the cells to a target confluency of 50-70%. For example, Element Biosciences incubates HeLa cells for 16 to 18 hours.
Washing/handling
At any point after the cells have been seeded and attached, and prior to fixing, we recommending using the following techniques.
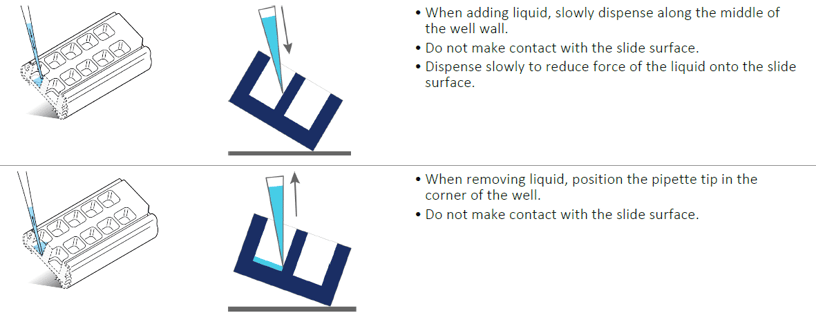
- When adding media, dispense slowly along the middle of the well wall. This allows the liquid to flow more gently across the cells.
- When removing media, tilt the slide and position the tip towards one corner. Leave a small amount of liquid behind, ~30-50 µL. Avoid making contact with the slide surface.
Fix cultured cells
Using 4% formaldehyde, fix the cells at room temperature for 20-30 minutes using the pipetting techniques previously described.
Once the cells are fixed, they may be stored in 1x PBS with RiboLock at 4°C for up to 30 days.
Summary
At this point you've successfully seeded and fixed your cells! Proceed to the next step to review videos for these pipetting techniques.
Seeding cells into the slide kit
Disperse cells using a rocking motion
Adding liquid after seeding
It is important to minimize disturbance when performing steps involving addition of liquid to live cells. Pipette slowly and against the well wall to remove strenuous forces on the cells. Additionally, leaving a little bit of liquid behind when removing liquid ensures liquid gently flows over the cells.
Removing liquid after cells have adhered
Phenotypes to avoid
To ensure best results, practice pipetting techniques such as slow pipetting and proper dispersion as described in the videos. View the cards below to see examples of poor seeding and the best ways to avoid them.
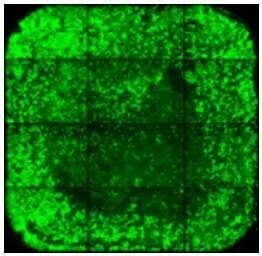
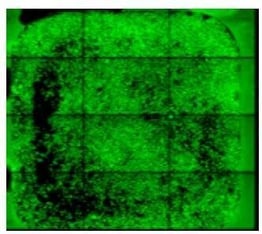 |
To avoid the ring pattern that you see here, avoid circular movement of the pipette or slide kit. Use a side-to-side movement for uniform cell distribution. |
 |
To avoid cell loss in the corner of the well, pipette slowly to prevent bubbles when dispensing cells. Avoid pipette tip contact with the surface of the slide. |
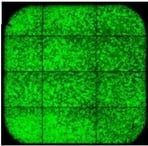
 |
Cell loss in the middle of the well can be caused by liquid impact - pipette slowly and against the well wall. |
 |
Avoid pipette tip contact with the surface of the slide to avoid scratch marks on the surface. |
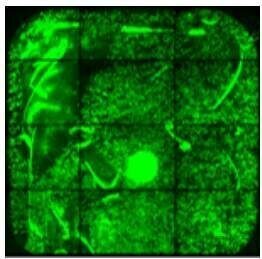
 |
Pipette tip contact with the surface of the slide can lead to cell loss in random locations. |
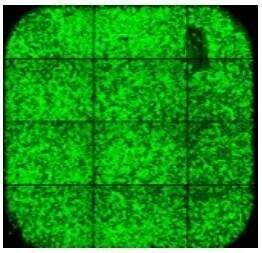
Successful Preparation
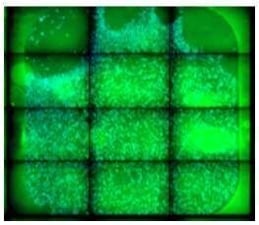
Below is an example well of a successful preparation. Please note:
- Even distribution of cells across the well
- Monolayer distribution without cell clumping
- Confluency of 50-70%
- Absence of nicks or scratches
 |
Successful preparation! |
For more information on Teton workflows, see the following resources: